Sunday, October 8, 2017

A Wedding Quilt . . . .

My niece and nephew were married at the end of July in 2016.
Such a beautiful couple and yes I am biased.


I promised a wedding quilt,
and then life got in the way.

Fast forward to August 2017. 
(I know 13 months late!)

(I apologize for the upcoming photos, not the best lighting!)

I had pulled all the fabrics for this quilt last year.
Their palette is navy blues, greys, and whites.
Not my usual, but I have found I do my best work
when challenged!
It's great to be pushed out of your comfort zone.
 

I call this quilt 2468.
I cut tons of squares,
2.5", 4.5", 6.5" and 8.5"
I threw all the big squares up on my design wall first.
Then started filling in with the smaller ones.

I also added rectangles 2.5" on one side to fill in and add interest.
 

I worked in sections adding in the smaller pieces
and piecing them together building on each square.

I loved the puzzling together of this top.
This could be a great way to teach kids math in a fun way.
All multiples of 2. 

I added white borders.
I was able to show this top at my guild meeting yesterday,
and the lighting is much better so you can get a good
idea of the true colors.
I plan to quilt this one with simple lines
so as not to distract from the graphic design.
So here we are, now 15 months past the wedding 
and I still need to quilt this and send it on it's way.
In the mean time, this beautiful couple 
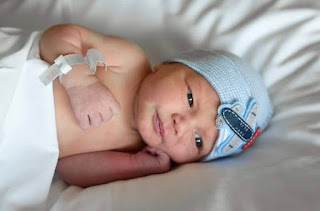
have made me a great aunt!

Sweet little Theo born September 24th.


And yes, now I am behind in my family quilts again!
Haha!  Wouldn't have it any other way.

Tuesday, September 19, 2017

Blogger's Quilt Festival :: Fall 2017

So it's that time of year again . . .

This year the prizes are drawn randomly for all entries,
and all the quilts are on one page.

Love it!

Here is my entry for the festival.
Meandering


I started this quilt about two and a half years ago.
The block is from Lady Harvatine,
 

I was having a sewing day with my queeps 
in NYC . . .  
I grabbed the pattern and the fabric and started making blocks.
And . . . . I got about this far.


Then it sat in a box for two years
while I worked on other things.

 Fast forward to last June
and another sewing day in the city with my sewing buddies.

I churned out more blocks and put this top together.


I wanted to make it bigger and decided to add borders,
but to have the curves spill over into them.

I drafted new pattern pieces so I could achieve this look.

My Meandering quilt hung in
my quilt show at the Darien Library this past summer,
and it was very well received.


So well in fact, the library bought it.
They especially loved the dictionary print I used for the background.
 
It hangs permanently on the second floor.
Now that is very exciting for me!


Thanks so much to Amy for the 
And bringing it back to its roots.
Hope you all enjoy perusing the fabulous quilts.


Saturday, January 7, 2017

#wanderingquilt and my center . . . .

I was fortunate this past fall to be asked to join
a group of quilters who want to do
a round robin quilt project.

I have been intrigued by these group quilts, 
and the collaboration that goes into them,
so I jumped at the chance to be included!

Here is the premise:
Each quilter makes a center,
creates a theme, and a layout.
Puts together a journal to travel with it,
so that each person can record notes, 
thoughts, etc when the work on the quilt. 

There are ten of us.


We will each get to work on each others
quilts, and at the end of October 
we will receive our  quilt top back!
I,  of course, have decide on a 
mermaid/sea theme.
So that needs a mariner's compass for the center!


I couldn't find any patterns I liked,
so I decided I would draft my own center.

pattern as a base for the circle.

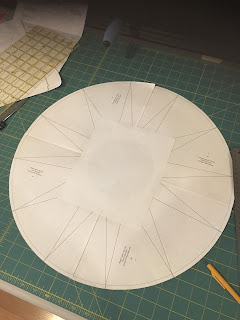
I taped the four arcs together o make a circle,
Just as I altered that pattern for my Circle Star Quilt.

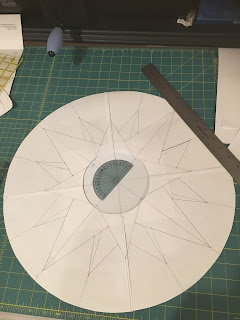
Then I flipped it over and started drafting the mariner's compass.

I used a protractor to make sure my angles were correct.

I wanted it to be a fuller, simpler compass,
many I have seen have just too many points for me.

This made 8 triangle parts that needed to be pieced.
I picked two opposites that looked the best,
and traced them four times each.
noting the colors that should be in each part.

Each triangle has three different foundation pieced parts
that were then sewn together.

I laid it out hoping it would look they way I wanted to.


And Yay!  I loved it.
I trimmed it up and added the corner pieces.

Now it's all ready to be shipped off at the end of the month!
Follow our group on Instagram
I can't wait to see how everyone 
adds to each of the quilts.
Happy New Year!
May 2017 be all you need it to be.

Thursday, November 10, 2016

Cathedral Windows . . . .

Cathedral Windows . . . 

I have had many inquiries as to the cathedral window project
I am showing on Instagram. 

Asking if I can show how I'm doing it . . . 

I'll give it a whirl.

In 2008 I took a class at the City Quilter
with the famous Judy D


There were many different variations in the book,
and we tried most of them, 
but the traditional style was the one I really enjoyed.

 Then last year I saw this variation on Instagram!
by @gogokim  AKA Kim Niedzwiecki
I loved the black and white with the colors.
One of my fave combos!


Here is another shot.
 
  I wasn't sure how she constructed it.

And while visiting my friend David last summer
in Portland, I decided to try to figure it out.
Luckily we were at his friend Jane's house
sewing that weekend, and she had the book!
(Because when I downsized I foolishly let it go!)

I don't have alot of the beginning progress pics,
but if you read the book,
it's pretty easy to figure out the basics of constructing the blocks.

It is time consuming, but totally worth it.

Below are the blocks that have been sewn and turned inside out.
(This is a great quilt because as you sew, it basically finishes.
No further quilting necessary.)


Then I pressed the corners into the center on all the blocks.
You need to make sure everything is lined up 
correctly or it will skew as you proceed.


I sewed the blocks together by machine
because it was quicker.
(I have sewn them by hand in the past.)

Again, marking and accuracy matter!


First I sewed the blocks into rows,
and then I sewed the rows together.
 

Here is my foundation layout.
 

I cut squares that were a scant smaller 
than the open inside area and pinned them inside.


After that, I hand sewed the points together
for each block.

I also cut squares for the windows.
These are a scant smaller that the window space.
 

I carefully pinned the edges down for each window
and hand sewed them like binding.
Careful to make sure the corners looked okay.
 

Now here is where I find it got tricky.
By putting fabric under and in the windows,
it's hard to cover the raw edges of the background fabric.

The book shows you one way or the other,
but not combining the two methods together.

See how that raw edge is showing?
I will probably go back and fuse those corners down
 

This little project I started was really to figure it all out,
and see where it needs tweaks,
I offer this adjustment as a possible way to fix the
raw edge problem.

I cut squares for the inside bigger than needed
and pressed the edges over so it fits snugly in the center space.


Then I cute a piece of the Mistyfuse exactly the size of the center
 

I carefully laid the piece on top of the Mistyfuse
and pressed it down.
This may give you some extra bulk, 
but you won't have the raw edge problem.
 

After fusing the background centers in,
go ahead and tack the corners together.

I'm making good progress on this little wall hanging,
and I have figured out most of the finagling
I will need to do to get it where I love it.
 

Below is a little one I made in 2009.
Here you can see how the two different versions work.
The ones in the corners with background fabric
inserted behind have smaller openings to cover the raw edges.

The center blocks leave the edges and background the same fabric. 


So thanks for asking how I did it!
I hope this helps you figure out the way you want
to approach yours.

And Thanks @gogokim for inspiring me in the first place!

Saturday, October 22, 2016

Meadow Storm by Victoria Findlay Wolfe and Marcus Farbrics

I am so lucky!
I received this lovely stack of Meadow Storm fabrics
by Victoria Findlay Wolfe 
a few weeks ago from Marcus Fabrics.

There is something so fun in unwrapping a stack like this!
Spreading it out . . . Oh the possibilities!


This line has many wonderful fabrics,
but this one is a fave!  Misty!
I love the deep rich color.


Now what to do!  
I took out Victoria's victory block template set and started to play around.


I've used these templates before, but wanted to see if I could 
make something different with them.

They are very versatile.


I started by cutting out the darker valued fabrics first.
I wanted to make them pop with the lighter fabrics mixed in.


The black and white chevron, which I LOVE,
was too strong, so I thought maybe a border instead.
It looks like eye brows right?  Hehe

Wasn't loving it yet, so I cut up new centers.
This I love! But those eyebrows . . . .

I needed more light colored fabric, 
and lucky for me,
I just had some Mostly Manor Nelson on hand!
 

With some playing around, and re-arranging,
I found my layout!
I just love the different things I'm seeing here.
The eye brows found a perfect home and give me a cross
I had not anticipated.
LOVE IT!

Victoria's templates are fun and easy to use.
I love when my points come together and lay flat.

Here is my top all together.
(Sorry for the gloomy apartment pictures) 

Now to decide how to quilt it!


As you can see from the template page here,
there are lots of variations on this block to try out.

for the fun play time!