Showing posts with label handemade goodness. Show all posts

Thursday, November 10, 2016

Cathedral Windows . . . .

Cathedral Windows . . . 

I have had many inquiries as to the cathedral window project
I am showing on Instagram. 

Asking if I can show how I'm doing it . . . 

I'll give it a whirl.

In 2008 I took a class at the City Quilter
with the famous Judy D


There were many different variations in the book,
and we tried most of them, 
but the traditional style was the one I really enjoyed.

 Then last year I saw this variation on Instagram!
by @gogokim  AKA Kim Niedzwiecki
I loved the black and white with the colors.
One of my fave combos!


Here is another shot.
 
  I wasn't sure how she constructed it.

And while visiting my friend David last summer
in Portland, I decided to try to figure it out.
Luckily we were at his friend Jane's house
sewing that weekend, and she had the book!
(Because when I downsized I foolishly let it go!)

I don't have alot of the beginning progress pics,
but if you read the book,
it's pretty easy to figure out the basics of constructing the blocks.

It is time consuming, but totally worth it.

Below are the blocks that have been sewn and turned inside out.
(This is a great quilt because as you sew, it basically finishes.
No further quilting necessary.)


Then I pressed the corners into the center on all the blocks.
You need to make sure everything is lined up 
correctly or it will skew as you proceed.


I sewed the blocks together by machine
because it was quicker.
(I have sewn them by hand in the past.)

Again, marking and accuracy matter!


First I sewed the blocks into rows,
and then I sewed the rows together.
 

Here is my foundation layout.
 

I cut squares that were a scant smaller 
than the open inside area and pinned them inside.


After that, I hand sewed the points together
for each block.

I also cut squares for the windows.
These are a scant smaller that the window space.
 

I carefully pinned the edges down for each window
and hand sewed them like binding.
Careful to make sure the corners looked okay.
 

Now here is where I find it got tricky.
By putting fabric under and in the windows,
it's hard to cover the raw edges of the background fabric.

The book shows you one way or the other,
but not combining the two methods together.

See how that raw edge is showing?
I will probably go back and fuse those corners down
 

This little project I started was really to figure it all out,
and see where it needs tweaks,
I offer this adjustment as a possible way to fix the
raw edge problem.

I cut squares for the inside bigger than needed
and pressed the edges over so it fits snugly in the center space.


Then I cute a piece of the Mistyfuse exactly the size of the center
 

I carefully laid the piece on top of the Mistyfuse
and pressed it down.
This may give you some extra bulk, 
but you won't have the raw edge problem.
 

After fusing the background centers in,
go ahead and tack the corners together.

I'm making good progress on this little wall hanging,
and I have figured out most of the finagling
I will need to do to get it where I love it.
 

Below is a little one I made in 2009.
Here you can see how the two different versions work.
The ones in the corners with background fabric
inserted behind have smaller openings to cover the raw edges.

The center blocks leave the edges and background the same fabric. 


So thanks for asking how I did it!
I hope this helps you figure out the way you want
to approach yours.

And Thanks @gogokim for inspiring me in the first place!

Sunday, April 3, 2011

Sunday Projects #20

Today was a quiet Sunday,

and I really needed it.


I have been go, go going for the last 10 days,

and while I love it,

sometimes you just need to do nothing.

Well, not nothing, but less.


I started a little scarf with some yarn I bought

online at the Stitchuary.

I met Lori and Susan in a sewing class

and they told me all about their new website.

It's pretty cool, you can search yarn by many different categories,

breed of sheep, location where the sheep live,

types of yarns . . . .


I would really recommend checking it out,

even if you aren't a yarny person.

This yarn is made from 100% Merino Sheep

from a Northeast Farm.


************


I dragged out this little bag I made a few years ago.

I always use it in the spring,

it kind of jump starts the season for me.


I made the bag from a pair of child's jeans

that I bought at the thrift shop.


It was pretty easy to do. I just chopped off the legs and did a box pleat bottom. I covered a piece of cardboard with the extra jean fabric and put that in the bottom of the bag to keep it flat. I love this bag because it's not big and it has lots of little pockets all the way around. You could put any belt in you want. I used a cute little scarf that I rolled on this bag. I have also made ribbon belts to go on them too. Now I just need the weather to get warm enough to wear flip flops and I'm off to the beach! Hahaha. I think I have a while to wait. What did you do this Sunday???

Monday, December 20, 2010

Beading

I used to be a "beader."
I made lovely necklaces and earrings.
I even made my own beads out of clay.
That must have been a million years ago . . .


My very good friend Nancy wanted an eyeglass chain for Christmas.
She has lost two or three pairs of very expensive reading glasses
and has now decided eyeglass chains aren't so bad.
Please . . . we are of a "certain" age now.
So I made her two. One is a mermaidy green beach glass look . . .
And one in a bright colorful, I can find these look.
I swear they have made the holes in those beads smaller since I tried to make
something with beads!
Really, I could barely see the holes, it was more like intuition to get them on the wire.
I also "made" this . . .


My other great friend, Anne, gave me this crystal last night.

It has very amazing energies. Hey, I could use some amazing energies!
Especially this week.


I was given explicit instructions to wrap wire around it and hang it from my neck.
This only took three tries to get the right amount of wire
so you could still see the crystal and it won't take a nose dive from the chain.

I think this is going to be my new favorite luck charm.

Do you have something that brings you luck that you love to wear???


Sunday, December 19, 2010

Sunday Projects #7

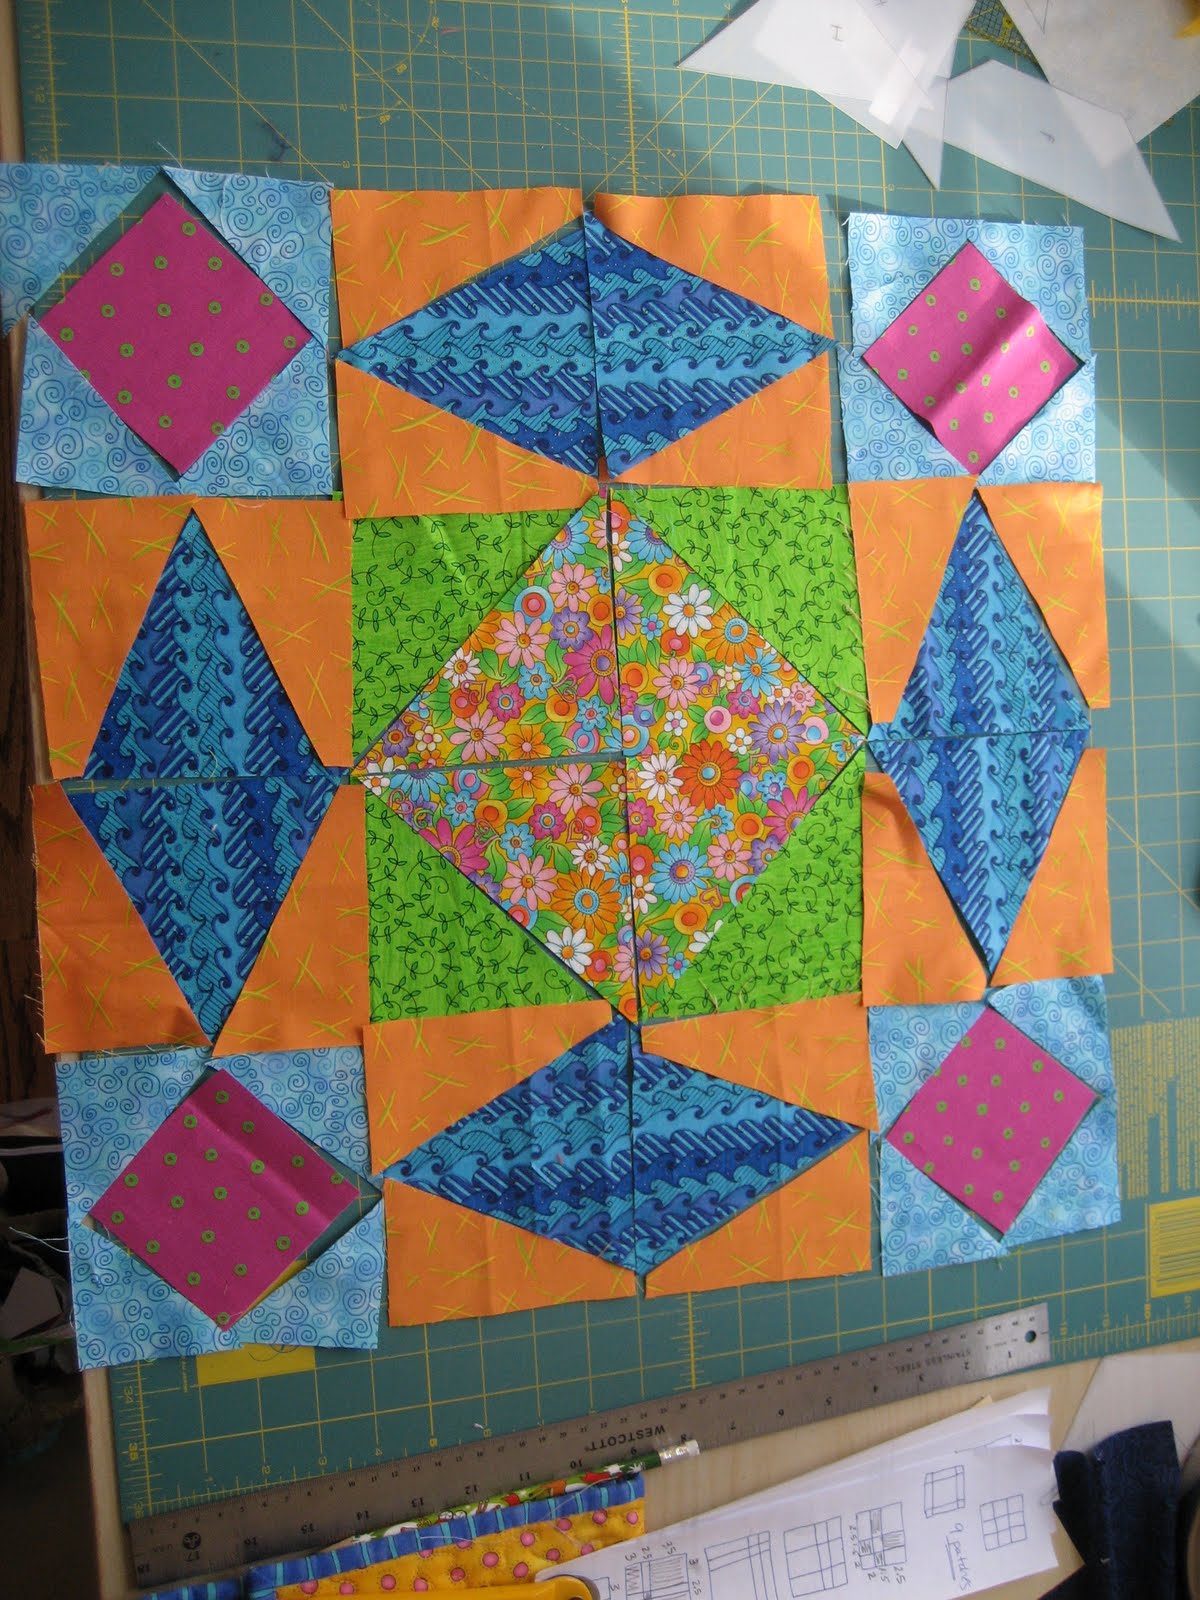
I received this book in the mail last week . . .
In my exploration of all things triangley, I decided to
check out this book after it was recommended to me by a friend.
This is a really great book!


First I cut out some templates in a variety of shapes.
There are great directions and it was easy to follow.

I decided on a simpler block to start off with . . . just to get my feet wet.

There are some very cute quilts in this book with fish, and whales and nature scenes.

I wasn't loving the first center I cut, thought it needed something to
tie all the colors together, so I switched to this bright floral fabric


This block went together pretty quickly.
I am going to try a few of the harder ones this week . . .

That is if Christmas doesn't get in the way! hahaha.


I also whipped up a couple of these little wallets.
They are so sweet. You can fit a few credit cards and cash in them,
stick them in your pocket
and be on your way!
What fun things are you working on today???


Sunday, December 12, 2010

Sunday Projects #6

Wasn't feeling the sewing love today . . .

Thought I lost my mojo.


So I took out a charm pack and decided to just do some very simple

sewing . . . putting 5" blocks together to make a baby quilt.


For what baby I don't know yet.


It's cute. Need to piece a back now.
Then the QADD kicked in. You Know Quilter's ADD.
I started bouncing all over the sewing room.
"What should I do next?"
"I'm not feeling the love for any of it right now."


"OMG, there's some fabric I didn't know I had."

You know, like a squirrel on crack.


And then I spied this pile of men's shirts I bought at the thrift shop.

Wasn't sure what I was going to do with them, but the fabrics were nice
and the colors were bright.


I remembered a cute little item I saw in a store in the Boston
area last year. I didn't buy it because, well, you know . . .
"I could make that myself!"

I didn't take a picture of it either because shop owners don't like
crafty people photographing the wares.
They want you to buy them!


After an hour or two of cutting and sewing
I had a nice little apron.
The collar from the shirt is now the waistband.
The pocket is left on the front, although it is hard to get your hand in it.

It needs alittle tweaking. And I need to MEASURE next time.
You know me just cutting it up and winging it!


On another note . . . . .
While I was cutting that shirt up, I looked out my sewing room window
and saw this big fat squirrel (not on crack) sitting right in front of me chomping on a nut.


Can you see him on the branch?
He looked very pleased with himself!


Did you make anything fun today?


Saturday, December 11, 2010

Wreath Construction

I love making as many of the things for Christmas as possible.
I love a wreath with lots of different greens, but they are so expensive.
I bought a plain wreath at the grocery store.
Then I took my clippers and basket and headed for the woods . . .
and the beach.
Our beach has lots of different evergreens growing around it.
Over the years I have figured out where to hoist holly, clip balsam with the pine cones still attached, and just recently I hit the mother load with juniper.


So I started with my Charlie Brown wreath.
Poor thing, I didn't realize how lopsided it was, but as with everything else
it just gives it more character and that homemade feel.


I laid out all my "stash" from my covert clipping.


The leftovers will go into a flower arrangement later today.


So after much wiring and clipping and a few cuts and scrapes,
I have a great wreath for the front door!
What are you making today?


Tuesday, December 7, 2010

Ornaments

I love Christmas ornaments. They are small and cute.
I began collecting them 30 years ago when we owned a retail store
and I would decorate 20 trees each year.
But about 15 years ago I started making these wonderful little guys.
I bought a pattern, I don't even know where it is anymore, sorry.
These are all tiny little animals some with shorts and other yummy things.


The cow was one of the first ones I made.
He is really tiny. Over the years I have had to
enlarge them a bit.
The hands just can't do that teenie tiny stuffing anymore.

Here is a shot of the group.
I just love looking at them all lying there together.


I named them all. This one is Too Tall McCall.
I cut hair pins for his little antlers. Are they antlers?? Or ears??


This is Chocolate Mousse.


Every year I make a few for gifts.
This year the geese are up again. And maybe a few cows. Love the cows.
Do you make anything special for the holidays?